How I Build This Site
This blog post serves to document how I set up my personal website using the static site generator Hugo. It includes the steps I took, next steps, enhancement ideas and resources I came across that helped me launch my website.
Updates
Initial setup: Sunday, January 6th 2019
- Got all the way to step 6. Have a working website with reading time capabilities and a couple of articles.
Update 1: Monday, January 7th 2019
- Successfully deployed website using Netlify. Made some changes to file names, updated post front matter information.
- Discovered the
[tree]command for generating a tree like structure of directories.
Update 2: Tuesday, January 8th 2019
- Hit a bug with posts not rendering the sidebar background color on the Netlify production website. Revert to not showing sidebar menu in posts.
- Used Netlify’s Deploy-preview and Branch preview to test alternative versions of website.
Update 3: Thursday, January 10th 2019
- FINALLY resolved the sidebar menu no background color issue by using CDN (Cloudinary). Website now properly rendering :)
- Moving to building more content.
Overview
Below are the steps I am taking to complete this initial blog launch:
- Create initial Hugo site
- Add theme
- Get working website with chosen theme
- Add ReadingTime to Articles
- Create Netlify account
- Set up deployment via Netlify
- Create About page
- Create now page
- Set up comments via Disqus
- Set up Google Analytics
- Get a custom domain name (
johannesgiorgis.com) and connect it to Netlify - Jupyter Notebook integration via hugo_jupyter
Enhancement Ideas
Below are a list of enhancement ideas for down the road:
- Add Article Series capability
- Allow reading time to be added/removed via config file
Setup
1. Install Hugo
On my Mac, I use brew to install Hugo:
$ brew install hugo
and verify the install:
hugo version
Hugo Static Site Generator v0.53/extended darwin/amd64 BuildDate: unknown
which hugo
/usr/local/bin/hugo
2. Create New Hugo Site
I create my Hugo site called, ‘personal-website’ and initialize the git repository following the Hugo Quick Start guide:
hugo new site personal-website
cd personal-website
personal-website/
├── archetypes/
├── config.toml
├── content/
├── data/
├── layouts/
├── static/
└── themes/
git init
I create the initial commit:
$ git add .

$ git commit -m 'First commit'
[master (root-commit) c1bfd3b] First commit
 2 files changed, 9 insertions(+)
 create mode 100644 archetypes/default.md
 create mode 100644 config.toml
Next, I create the Github repository and add the existing local git repository to it:
$ git remote add origin git@github.com:johannesgiorgis/personal-website.git
$ git remote -v
origin	git@github.com:johannesgiorgis/personal-website.git (fetch)
origin	git@github.com:johannesgiorgis/personal-website.git (push)

$ git push -u origin master
...
Branch 'master' set up to track remote branch 'master' from 'origin'.
Afterwards I follow the rest of the Hugo Quick Start guide by setting up the ‘anande’ theme, running hugo server -D and navigating to the respective URL on my web browser to verify it is working.
Remove unused Hugo theme
To keep our repo clean, we should remove the unused ‘anande’ theme we installed as a git submodule while following the Hugo Quick Start Guide. Following the steps from StackOverflow: Remove Git Submodule:
List existing git submodules:
git submodule status
3e1e72871270da12dac575e1c7661ed8f061a14a themes/ananke (2.37-1-g3e1e728)
c7d2fdee5d258d95089e0ee73333f37e6e823e0d themes/tranquilpeak (0.4.3-BETA-47-gc7d2fde)
Unregister the submodule:
$ git submodule deinit -f -- themes/ananke/
Cleared directory 'themes/ananke'
Submodule 'themes/ananke' (https://github.com/budparr/gohugo-theme-ananke.git) unregistered for path 'themes/ananke'
Remove the directory from the .git/modules directory:
$ rm -rf .git/modules/themes/ananke/
Remove the directory from git:
$ git rm -f themes/ananke/
rm 'themes/ananke'
Our git repo is now clean again:
$ git status
On branch master
Your branch is up to date with 'origin/master'.

nothing to commit, working tree clean
3. Add Theme and Content
I decided to use the Tranquilpeak theme. It looks gorgeous and seems to include a ton of features.
Following the Hugo Quick Start guide’s example, I add the theme as a submodule and update my config.toml configuration file with the name of the theme:
$ git submodule add https://github.com/kakawait/hugo-tranquilpeak-theme.git themes/tranquilpeak
$ echo 'theme = "tranquilpeak"' config.toml
At this point, my config.toml configuration file looks like this:
baseURL = "http://example.org/"
languageCode = "en-us"
title = "My New Hugo Site"
theme = "tranquilpeak"
To get started, I add some content. I use post instead of posts for the directory, as the theme seems to only work with the former. When using posts, none of the directory’s contents are visible on the site.
hugo new post/my-first-post.md
cat content/post/my-first-post.md
---
title: "My First Post"
date: 2019-01-06T15:47:19+01:00
draft: true
---
Welcome!
Hi welcome to my blog :)
Finally, I start the Hugo server with the following options:
-D: build drafts-v: verbose output-w: watch file system for changes and recreate as needed
hugo server -D -w -v
The initial website looks pretty sparse :(
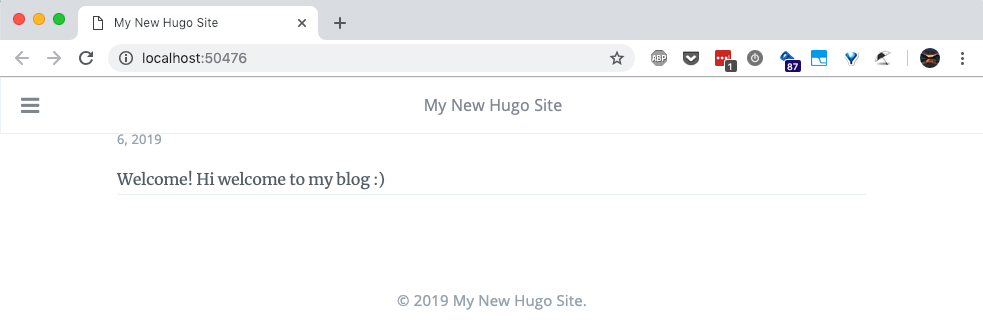
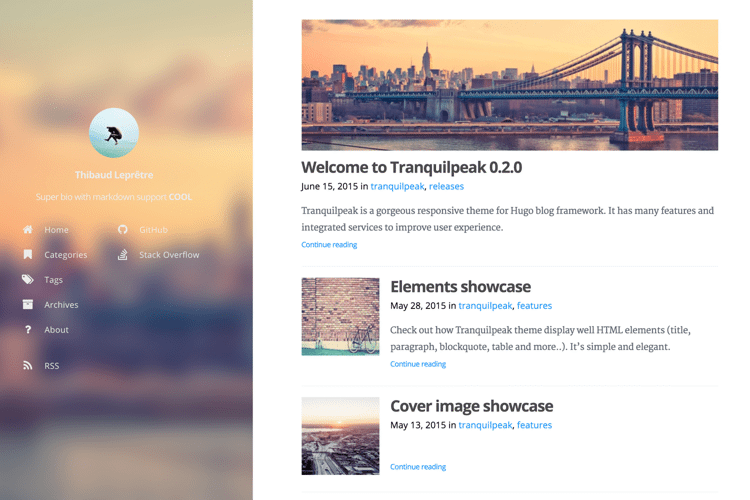
It doesn’t look anything like the gorgeous Tranquilpeak theme demo site:
4. Fix Sparse Site
Let’s fix the sparse looking site. First, I need an example site to get started with. Thankfully, Hugo themes tend to come with exampleSite directories which host example site contents for that theme and Tranquilpeak theme also comes with its own.
A. Set Up Example Site
The Tranquilpeak exampleSite is located under the tranquilpeak theme directory:
/<hugo-site-path>/themes/tranquilpeak/exampleSite
It contains the necessary files and directories to launch a Hugo website:
pwd
~/hugo_first_blog/personal-website/themes/tranquilpeak/exampleSite
exampleSite/
├── config.toml
├── content/
├── resources/
└── static/
Navigate to the exampleSite directory and run the Hugo server, which results in an error:
$ hugo server
port 1313 already in use, attempting to use an available port
INFO 2019/01/06 17:01:25 No translation bundle found for default language "en-us"
INFO 2019/01/06 17:01:25 Translation func for language en-us not found, use default.
INFO 2019/01/06 17:01:25 i18n not initialized; if you need string translations, check that you have a bundle in /i18n that matches the site language or the default language.
INFO 2019/01/06 17:01:25 Using config file:
Error: Unable to find theme Directory: ~/hugo_first_blog/personal-website/themes/tranquilpeak/exampleSite/themes/hugo-tranquilpeak-theme
Hugo is unable to find the theme directory. Updating the exampleSite’s config.toml configuration file to point to the right directory fixes the issue. Comment out the current ‘theme’, and add the below two lines to point to the ‘tranquilpeak’ theme directory created earlier (basically referencing its parent’s parent directory):
themesDir = "../.."
theme = "tranquilpeak"
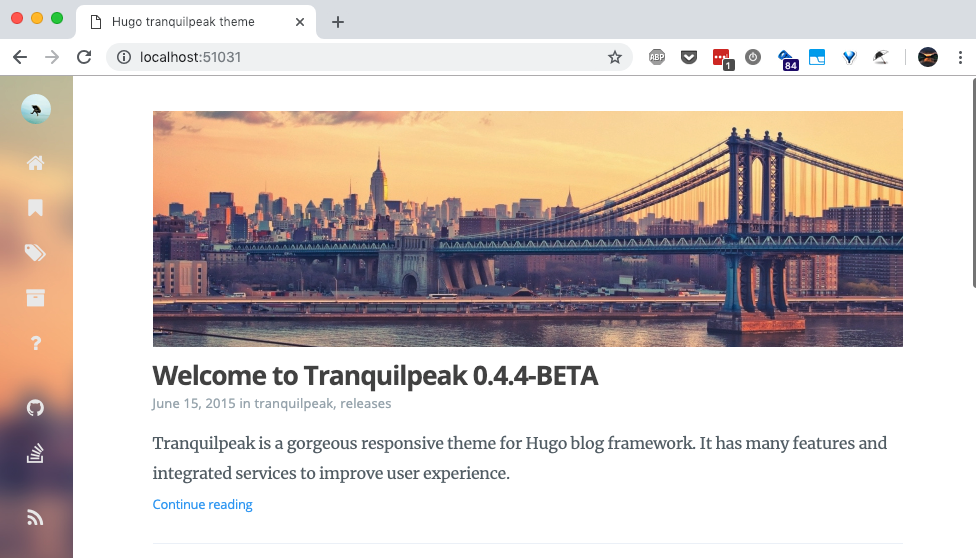
Running hugo server works now. Navigate to the respective URL and now we see the following. Much better!
B. Set Up Own Site based on Example Site
Now that we got the example site working, let’s get our own site working.
First, let’s copy the exampleSite’s config.toml configuration file to our site directory and see what that gets us. Make a backup of our current config.toml configuration file under our site directory before copying the file.
pwd
~/hugo_first_blog/personal-website/themes/tranquilpeak/exampleSite
cp config.toml ../../../
.git/ archetypes/ content/ layouts/ resources/ themes/
.gitmodules config.toml data/ orig_config.toml_bkup static/
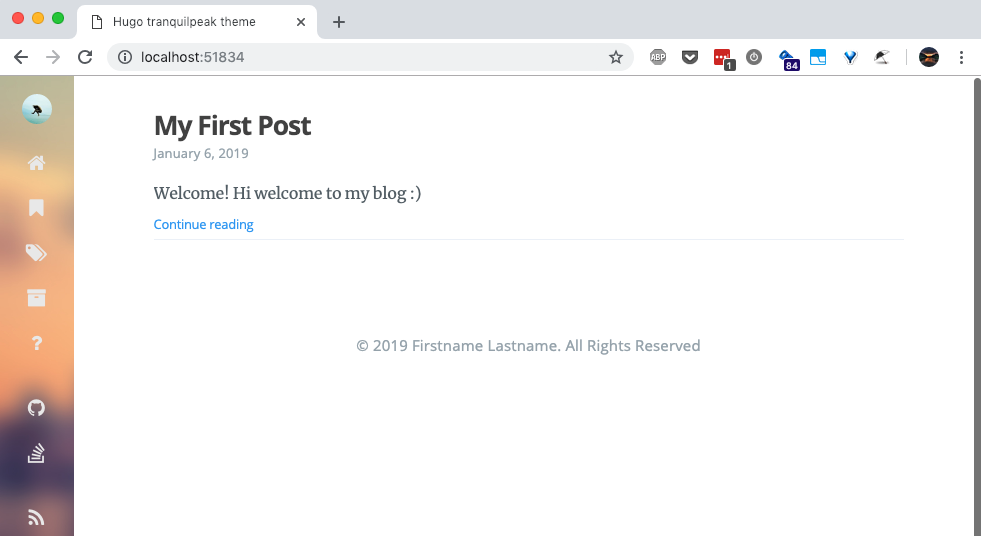
Running the Hugo server and navigating to our web browser, we see the following. Using the theme’s config.toml file helped fix our website. We are headed in the right direction!
5. Customize Our Initial Site
Let’s customize the title, copyright information and remove the StackOverflow logo from the sidebar menu via editing the site’s config.toml file.
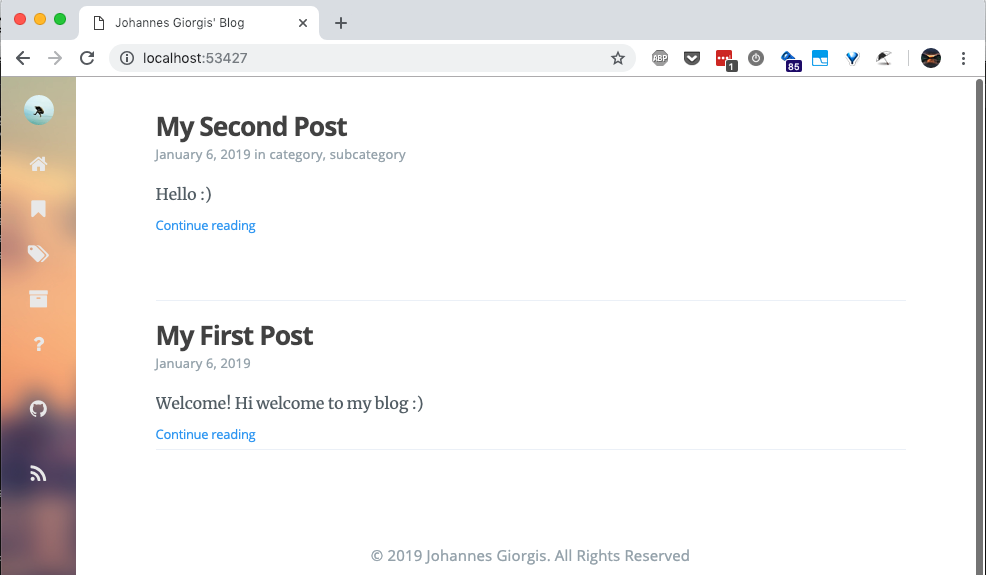
Next, we want to over-ride some of the theme’s default settings. First, let’s make copies of some of the files we want to modify from the theme default.
Archetypes
Copy the theme archetype files to the site archetypes directory:
pwd
~/hugo_first_blog/personal-website/archetypes
ls
default.md
cp ../themes/tranquilpeak/archetypes/* .
ls
archetypes/
├── default.md
├── page.md
└── post.md
For now, I want to update the default front matter information that is added to newly created posts. Edit the post.md to ensure new posts are in draft mode by default, and disable categories, tags, keywords and thumbnail image:
1 | |
I later made the following updates:
- added the
metaAlignment: centerline. This aligns a post’s metadata including its title, categories…etc. This is an out of the box feature that Tranquilpeak theme provides. - Converted categories, tags and keywords sections into lists/arrays.
- Uncommented categories and tags. Left them empty by default.
1 | |
Sidebar Menu Background Image
I want a more subdued color for the sidebar menu background image. I chose a navy blue background.
Create the images/ directory under the static/ directory:
pwd
~/hugo_first_blog/personal-website/static
mkdir images
cd images/
Download/Move the desired background image file to the images/ directory. This is also where I created the 2019-01-06-how-i-build-this-site/ directory to contain all the images you see in this post.
ll
...
drwxr-xr-x 8 jawg staff 256B Jan 6 23:43 2019-01-06-how-i-build-this-site/
-rw-r--r--@ 1 jawg staff 6.7K Jan 1 17:16 navy_blue.jpg
Great. Time to save this working website to our Github repository.
6. Additional Features
In this section, I cover adding additional features to my blog.
Reading Time
Reading time for a blog post is a useful feature that I want to include in my site. I came across several different Hugo based websites which included reading time for their respective blog posts.
After looking at other Hugo themes, lots of trial and error, I found a way to add reading time to my blog posts. In the tranquilpeak theme, the layouts/partials/post/meta.html file is responsible for each blog posts’s metadata including time stamp and categories.
First, create the partials/post/ directory under <site>/layouts/. Then, make a copy of the layouts/partials/post/meta.html file from the theme directory to the newly created equivalent directory under the site directory.
pwd
~/hugo_first_blog/personal-website/layouts
mkdir partials/
mkdir partials/post/
cd partials/post/
cp ../../../themes/tranquilpeak/layouts/partials/post/meta.html .
ls
meta.html
The original meta.html file contains the following:
...
{{ if not (eq .Params.showMeta false) }}
  <div class="postShorten-meta post-meta">
    {{ if not (eq .Params.showDate false)  }}
      <time itemprop="datePublished" datetime="{{ .Date.Format "2006-01-02T15:04:05Z07:00" }}">
        {{ partial "internal/date.html" . }}
      </time>
    {{ end }}
    {{ partial "post/category.html" . }}
  </div>
{{ end }}
To add Reading Time, I made the following edits:
- add reading time before the list of categories
- wrap categories around an if statement to ensure blogs with no categories had clean end (
1 minvs.1 min ·)
...
<!-- add reading time -->
<text> · {{ .ReadingTime }} min read</text>
<!-- add categories if page contains them -->
{{ if .Params.categories }}
<text> · {{ partial "post/category.html" . }} </text>
{{ end }}
</div>
{{ end }}
Now, the website blog posts include reading time :)
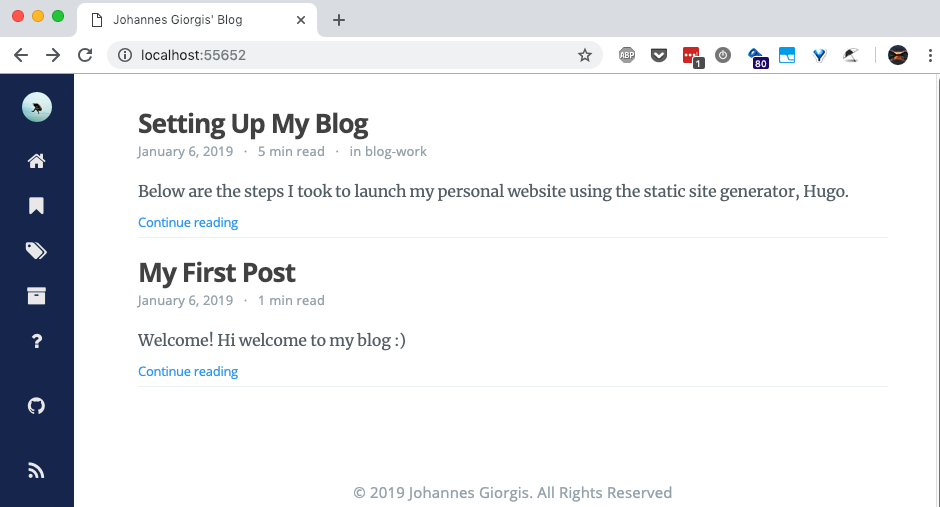
An enhancement idea is to allow the reading time to be controlled via the config file
7. Deploying Site
After some research, I decided to use Netlify to host my website. I heard it was easy to setup and use, provided good support for various types of static site generators.
Following the Hugo Host on Netlify Guide:
- Create a Netlify account
- Create a New Site with Continuous Deployment: connect personal-website Github repository to Netlify
- Configure Hugo Version on Netlify
- Build and Deploy Site
Note: Our config.toml file we have been using includes a baseURL = "https://example.org/" line which will break how our website looks. We need to comment out this line and commit the changes.
Netlify deploys our site under <random-app-name>.netlify.com. We can change the site name under the Site Settings menu. I changed my site name to johannesgiorgis.
And voila! Our website is up and available for anyone to access.
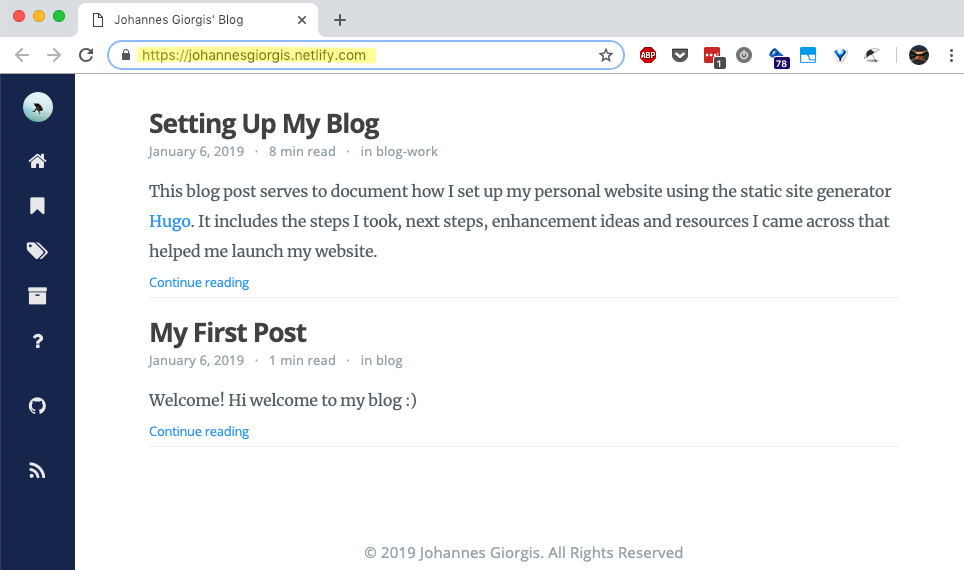
Verdict:
It was a great and seamless experience connecting my Github repository to Netlify, setting up the build configurations and watching my website come alive. Netlify lives up to all the great stuff I have heard about it. Making changes is as simple as a git push to my master branch and Netlify will update the site. I had to do this as my config.toml contained an invalid baseURL as mentioned in the note above, which broke the look of my site. Making the change to the file, committing it and pushing to master led to the working website you see above.
Netlify Configuration File
I setup a netlify.toml file in my repo. It contains configuration information for production, deploy-preview and branch-deploy environments.
1 | |
Netlify Test Deployment Options
Branch Deploys build every branch published in your repository every time you push to it while Deploy Previews give you an instant view of how your site will look once you merge.
When I want to test alternative configurations for my website, I use Netlify’s Branch Deploy and Deploy Previews. For more information, see the above link.
To set it up on your Netlify site page,https://app.netlify.com/sites/<your_site_name>/overview navigate to Settings -> Build & deploy. Under the Continuous Deployment section, scroll down until you see Deploy contexts. I set the below settings:
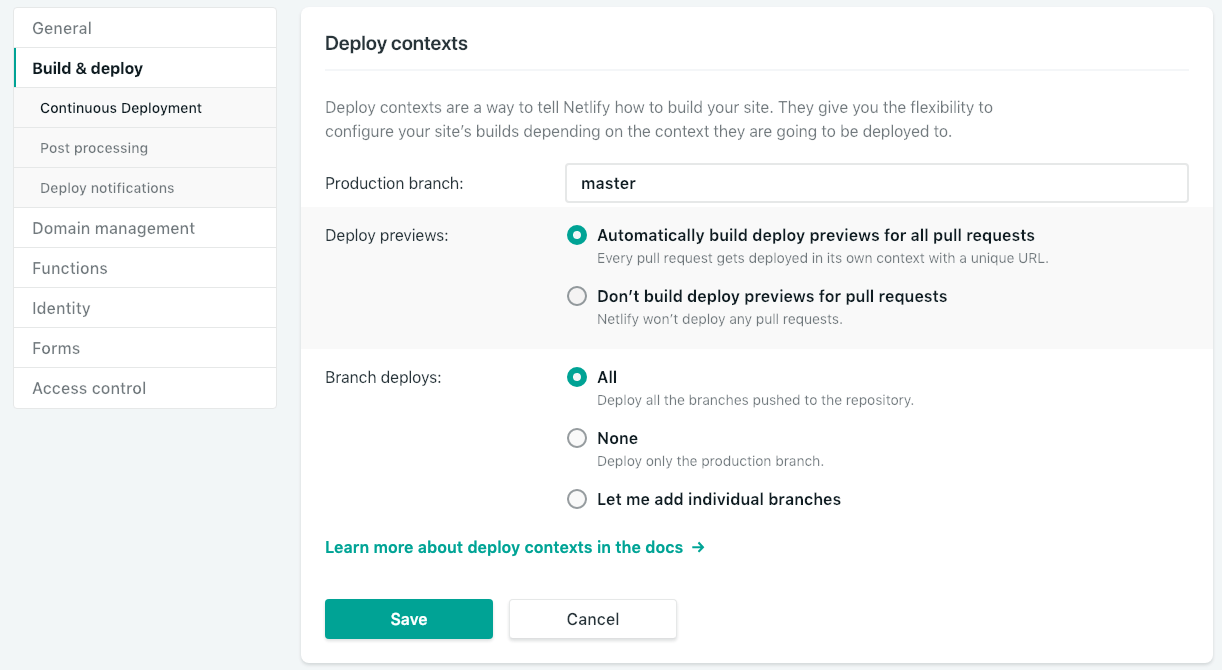
With the above setup, I just need to either create a pull request or a new branch to kick off a corresponding deployment. All without touching my master branch :). I also updated my netlify.toml configuration file to include settings for both deployments as seen above.
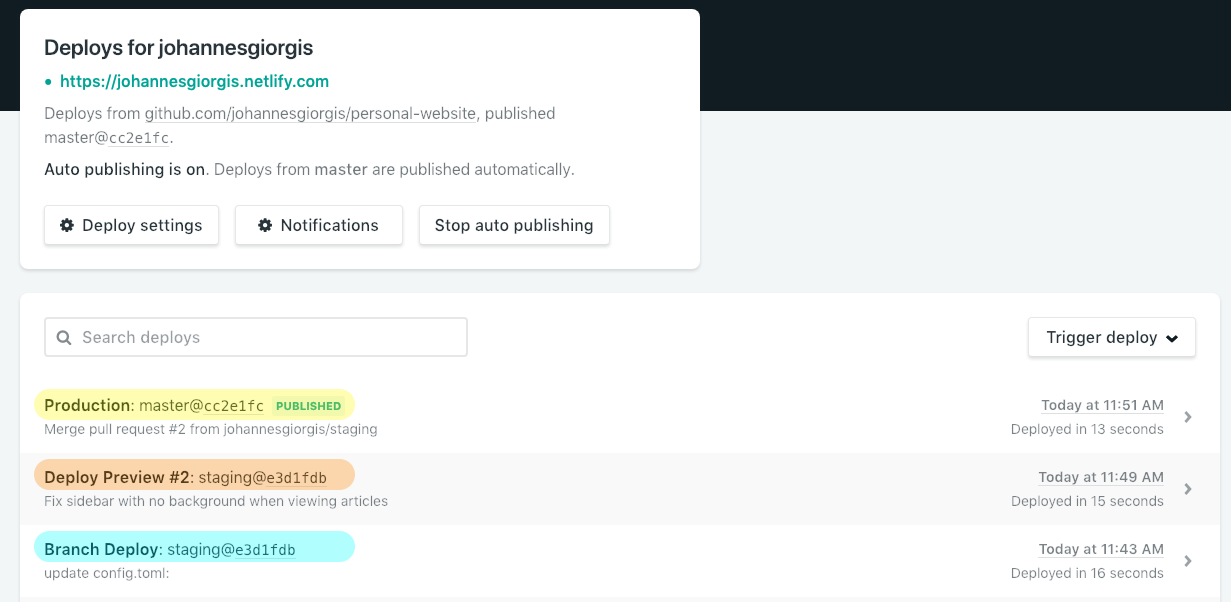
After each created pull request or branch update, navigate to the Site Deploys page to watch the deployment. We can see the published production site, a Deploy Preview and a Branch Deploy.
Lessons
1. Test your website on different browsers!
At one point, I was convinced there was a bug. The sidebar menu background was not rendering for any pages asides the homepage on the production website. This led me to try a launching branch and deploy preview versions via Netlify. I added the --gc --minify fields to my Hugo build command as the Hugo Host on Netlify Guide shows in their sample netlify.toml file. The site seemed to work fine in both cases, but the issue still persisted in production. I even tried it on my Google Pixel and iPad with no luck.
After all these failures, I tried to access the website on Firefox and lo and behold, it worked! Sidebar background color was showing up under every different page. This led me to think it was a Google Chrome caching the website issue as I was using Google Chrome on all my devices to access the website. I cleared Google Chrome’s cache of all Netlify related sites. And it worked! Posts still continue to not show the sidebar background color.
So lesson is to test your website on different browsers, especially when you are unable to re-create the problem in a similar environment.
Bugs
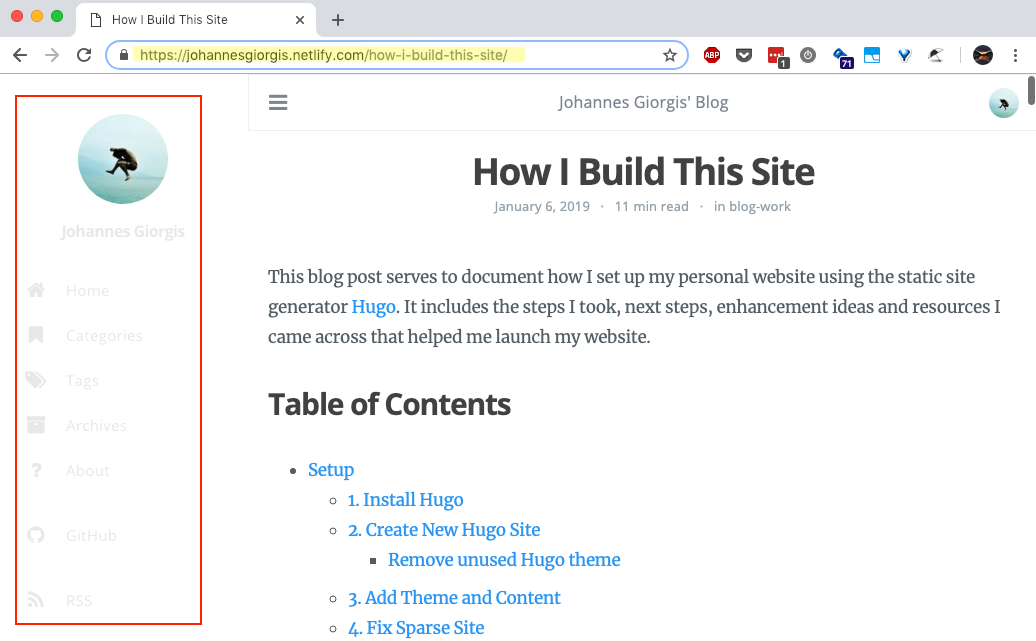
No sidebar background color on article pages
The sidebar background color does not show up for any post page on the Netlify production website:
However the Netlify Branch Deploy website has no problems showing the sidebar background:
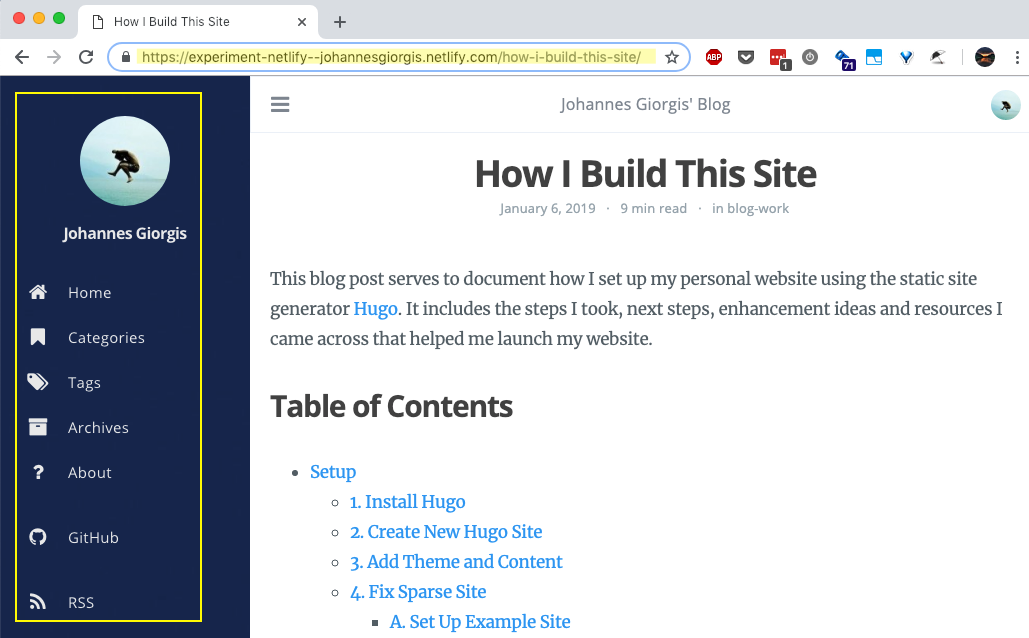
So I’m not sure if this is something on Netlify’s side or something missing in my site configuration file. I will keep exploring for now.
Resources
Hugo
- Hugo
- Hugo Quick Start
- Hugo’s Directory Structure Explained
- Hugo Install on Mac Discussion
- Youtube: Hugo - Static Site Generator Tutorial
- Developing on the Go
Why Hugo?
Deployment
- Netlify
- Hugo: Hosting and Deployment
- Hugo Host on Netlify Guide
- Netlify: Github Pages vs Netlify
- Netlify: Step by Step Guide Victor Hugo on Netlify
- Netlify: Continuous Deployment - Deploy Contexts
- Netlify: Get full control over your deployed branches
- Netlify: Introducing Deploy Previews
- Blog: Netlify instead of Github Pages
- Blog: Moving to Netlify
- Blog: Why I like Netlify
- Migrating from Github Pages to Netlify: how and why?
- Blog: Hosting Hugo on Netlify
Miscellaneous